Content begins here
Contenido de la página principal
Pulsa para colapsar
In this section more details about the use of E-Scrum are given. It is divided into four sections:
- The team: this section describes how to form a balanced team and proposes some tools to work collaboratively.
- The methodology: this section presents a use case in which we applied the EScrum methodology with the aim of implementing a photo-video concept multimedia.
- Resources: a table with links to all the materials to be used in each sprint is presented.
- The evaluation rubrics: this section shows some rubrics that can be used to evaluate each sprint of the EScrum methodology.
The TeamPulsa para colapsar
E-Scrum implies team working, so the teacher must divide the students into teams, up to five members in each team (Scrum Teams). If teacher knows students, it is easy for him to create balanced groups. These groups should contain, at least, the following characters:
- Scrum master: a person with leadership skills. He coordinates the team and is the contact person for the Product Owner (the teacher, as explained below).
- Secretary: a person with organizational skills who will be responsible of reporting the meetings, following up the work and keeping the team tools updated.
- Innovator: a creative person able to introduce lateral thinking in the teamwork.
- Technician: a person with high digital competences, who should be able to learn how to use new software quickly.
Regardless to each member´s character, all of them have to work in the implementation of the product. Unfortunately, it may not always be possible to create such a balanced team, so the teacher shall do his best.
E-Scrum teams are self-organized; this means that they can choose the tools to perform their work, such as the collaborative software to keep the work updated. Some interesting tools are available in the market, such as those included in Office365 (OneDrive, Word, Excel, Planner, Calendar…), those provided by google (GoogleDrive, Docs, Sheets, Jamboard, Calendar…) or other included in Altassian package (Jira, Trello, Bitbucket…). In any way, it is important to use collaborative tools in order to maintain transparency in the ongoing work. These tools should include at least:
- A canva or table where the project status is always updated
- A repository where all the files are available
- A calendar where events are marked
The methodologyPulsa para colapsar
In order to clarify the development of the methodology, we are going to use a fictitious example. In this example, we work with a science teacher of a secondary school from Gandia, who wants to explain the water cycle and introduce the problem of water conservation. In Gandia, there is a wetland, called Marjal, where an ecomuseum is located. This museum contains an exhibition where the water cycle is explained using the Marjal as a reference. The teacher proposes that they visit this museum and make a video related to the exhibition.
With the aim of making the work more realistic, the teacher takes the role of a conservationist that needs a video to encourage water conservation among youngest. In this case, the Product Owner will be the teacher, taking the role of the conservationist.
First step consists on presenting the project to the class in form of epic. This is a story that shows the context of the project, the needs and the expectations. In our example, the epic could be the following:
“My name is Pedro Morales and I have been working as a conservationist since 1997. I am totally convinced that the most challenging issue that humanity is going to face in the following decades is water conservation. Unfortunately, people are no worried about this issue because they do not understand that there is a limited amount of water in the Earth. I need your help to spread this message among your family and friends using two of the most powerful weapons that all of you have, your mobile phone and your imagination. I need you to record a video explaining the water cycle and the importance of preserving this cycle in order to conserve water. You can use all the resources provided by the ecomuseum, such are photos, booklets, panels etc. I am going to authorize you to record your own videos and audios here, using our installations. Remember that the aim of the video is educate and raise awareness about the consequences of water conservation.”
After presenting the epic, it is time to create the Product Backlog, this is the list of features that the product must fulfill. This task is developed by the Product Owner (the teacher) in collaboration with the Scrum Team (the students).
The Product Backlog is composed by a sheet for each feature (called User Story) and each one contains the following fields:
- An identifier (this is a number to identify every user story)
- A description of the user story. This description must follow the template “As a < type of user >, I want < some goal > so that < some reason >”.
- The priority of the user story, this informs about how important this feature is for the Product Owner. It is a number, the higher its value the higher its priority.
- Time estimation, how much time does it take to complete this user story
- Checklist to validate the user story
Next table shows an example of product backlog. We have included only two user stories, but it could contain more. A good practice could be that every team will develop only one user story. The priority informs us about the importance of each user story so teams should choose the most important in the first place.
| Identifier | Description | Priority | Time | Validation checklist |
| 01 | As a conservationist I want a video so that it presents the water-cycle in an understandable way | 100 | 30 h |
|
| 02 | As a conservationist I want a video so that presents the problem of water conservation | 80 |
30 h |
|
| 03 | As a conservationist... |
Some recommendations about the Product Backlog:
- It has to be leaded by the Product Owner in order to assure that the validation checklist contains the main items that should appear in the multimedia. It is a way to focus the work of the students.
- This validation checklist is not a rubric for the evaluation. In the rubric the teacher will include all the technical aspects that he considers important to evaluate, meanwhile in the validation checklist the features of the product are included, without detailing the quality.
The implementation of multimedia can be divided in seven Sprints, as can be seen in Figure 1. Each sprint has a duration of two weeks. The teacher proposes each sprint and give students all the materials that they need to develop its outcome. Rubrics for the evaluation of each sprint are also shared with students so they know where to put the focus of their work. Teachers can continue with their own program in the classroom, while students can work in the project by their own at home.
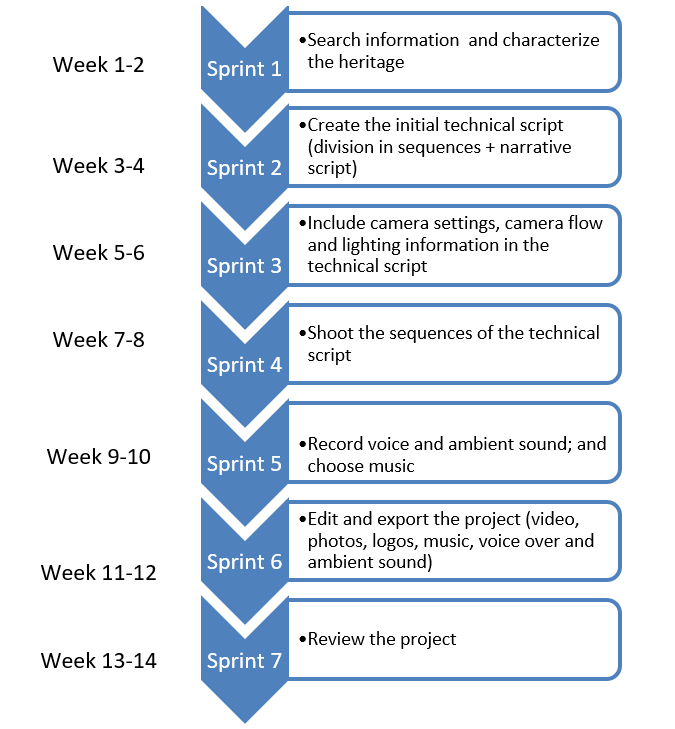
Each sprint has a duration of two weeks. The teacher proposes each sprint and give students all the materials that they need to develop its outcome. Rubrics for the evaluation of each sprint are also shared with students so they know where to put the focus of their work. Teachers can continue with their own program in the classroom, while students can work in the project by their own at home.
The events of each Sprint are:
- Sprint Planning: this is the first meeting of every sprint. In this meeting, the team decides what to do during the sprint and how to organize tasks, including who is responsible of each task. It is very important to define when the team considers a task as done, and this definition is stablished following the criteria given in the validation checklist. A minute report has to be done in order to highlight the tasks to do, the responsibility of each member and the planning. This minute report has to be available for the teacher revision.
- Daily Sprint: every day of the sprint, the team meets five minutes in order to revise the work done and plan the work to do. A minute report has to be done and it has to be available for the teacher revision.
- Sprint Review: once the sprint has finished, the team presents to the Product Owner and others stakeholders the result of the Sprint in form of viable minimum product. They review the product in order to demonstrate that it accomplishes the validation checklist. The teacher and other stakeholders are spectators, but they can ask any question and propose modifications.
- Sprint Retrospective: after the sprint review, the teacher meets the team and helps them to think about how they have managed the work. This is a meeting in which the team reflects about their way of working. For this, the teacher can:
- revise the minute reports in order to detect misconducts or problems in the organization of the group;
- ask about the roles and propose changes if he considers it is necessary;
- ask about the tasks done for each member;
- ask if there are some problems in the group; try to detect if some member is not working enough;
- propose some changes in the organization, way of working etc.
This meeting can also be used to revise the product technically; the teacher utilizes the rubrics to assess the work and give feedback to the team.
Next figure shows the Scrum events, detailing the roles that are involved in each one.

ResourcesPulsa para colapsar
Next table includes the description of each sprint, its outcome, the resources to be used by students, where to find these resources and where to find the rubrics to evaluate the sprint.
| Sprint |
Description |
Outcome |
Resources |
Rubric |
|---|---|---|---|---|
| 1 |
Search information and characterize the heritage |
Document with: description of the heritage, characterization, contextualization and SWOT analysis. |
Video T1.L1 Activities A.T1.L1.1 and A.T1.L1.2 Extra activity EA.T1.L1.1 |
RS1 |
| Video T1.L2 and Pill T1.L2.1 Extra activity EA.T1.L2.1 |
||||
| 2 |
Create the initial technical script (division in sequences + narrative script) |
Initial technical Script |
Video T1.L2 and Pill T1.L2.1 Activity A.T1.L2.1 |
RS2 |
| 3 |
Include camera settings, camera flow and lighting information in the technical script |
Complete technical Script |
Video T2.L1 and Pills T2.L1.1 and T2.L1.2 Activity A.T2.L1.1 |
RS3 |
| Video T2.L2 and Pill T2.L2.1 and T2.L2.2 Activity A.T2.L2.1 |
||||
| Video T2.L3 and Pill T2.L3.1 and T2.L3.2 Activity A.T2.L3.1 |
||||
| Video T2.L4 and Pill T2.L4 Activity A.T2.L4.1 | ||||
| Video T3.L1 and Pills T3.L1.1 and T3.L1.2 Activity A.T3.L1.1 |
||||
| Video T3.L2 and Pill T3.L2.1 Activity A.T3.L2.1 | ||||
| 4 |
Shoot the sequences of the technical script |
Video sequences |
Activity A.T3.L2.2 | RS4 |
| 5 |
Record voice and ambient sound; and choose music |
Audio files |
Activity A.T3.L3.1 |
RS5 |
| 6 |
Edit and export the project (video, photos, logos, music, voice over and ambient sound) |
Initial version of the video concept |
Video T4.L1 and Pill T4.L1.1 Activity A.T4.L1.1 | RS6 |
| Video T4.L2 and Pill T4.L2.1 Activity A.T4.L2.1 | ||||
| 7 |
Review the project |
Final version of the video concept |
Pill T1.L2.1 | RS7 |
| Extra Activities EA.T4.L2.1 and A.T4.L2.2 |
Rubrics for assessmentPulsa para colapsar
Next folders include the rubrics to evaluate sprint 1 to 7. Teachers must rate each specific criteria of a rubric on a scale from 1 to 5, according to the degree of compliance in which 5 corresponds to full compliance and 1 indicates non-compliance. To get the final assessment, the rate of each criteria is converted to points and all points are added, getting a final number of points. Students must get more than 12 points for their work in the sprint to be acceptable.