Content begins here
Contenido de la página principal
Pulsa para colapsar
ISO
In this lesson, we will learn:
1. What ISO is.
2. How to change ISO?
3. Which ISO do I need?
WHAT IS ISO?
The ISO setting is one of three elements used to control exposure; the other two are aperture and shutter speed.
For digital photography, ISO refers to the sensitivity—the signal gain—of the camera's sensor. Basically, ISO is a camera setting that allows you to brighten or darken your shots. As you get higher ISO numbers it progressively brightens your images. That’s why ISO is a great tool to use, especially in dark environments, and allows you to be more flexible in shaping your shots through your choice in aperture and shutter speed.
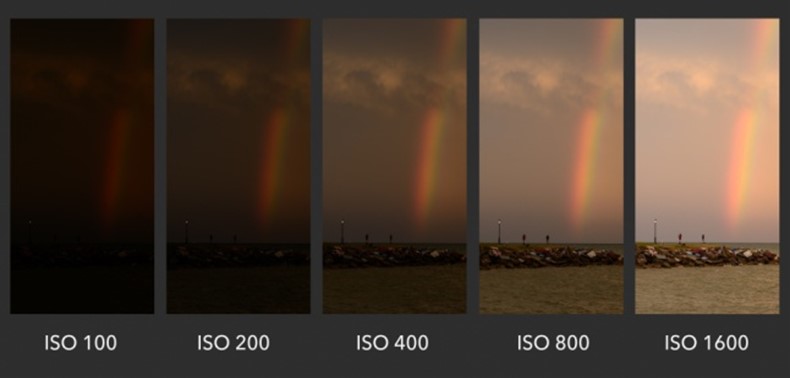
Image Copyright © PhotographyLife
HOW TO CHANGE ISO?
You can get better results if you use the manual mode of your camera instead of the auto mode. In auto mode your camera takes the key decisions and although the result may be good, sometimes it can be frustrating. Depending on the camera you have, you should change ISO as follows:
For a Canon Camera:
1. Get the camera in a manual mode. There is a round dial on top of the camera. You have to turn it around the letter M lines up with the little white mark.
2. Usually Canon gives cameras an ISO button at the back or the top of the camera. If you press it and turn the control dial on top of the camera you get to adjust the ISO.
For a Nikon Camera, simply hold down the function button on the front of the camera and turn the command dial. Dialing to the right for the larger ISO numbers and to the left for the smaller numbers.
If you do not have a Canon nor a Nikon Camera, or if you can not set the ISO value following the given instructions, you should check your camera manual. You should be able to change your ISO quickly in case you need to adjust it manually when shooting in low light conditions without tripod or flash.
WHICH ISO DO I NEED?
Every camera sensor has a sensitivity range to deal with the amount of ligth coming in. The setting ISO adjusts how responsive your camera sensor is to ligth. So, when we adjust a low ISO value, the sensor is less responsitive to ligth and it requires more ligth to create a well-exposed photograph.
During the daytime, you usually should use low ISO values because there is a lot of ligth and you want that light to have a nice soft touch to your sensor. However, in low-light conditions (shade, sunlight fading, dark areas, …), you should use higher ISO values to allow your camera sensor to accept more light.
When to use Low ISO (less than ISO 400)
Lower ISO number means less sensitivity to light and, of course, higher ISO number means more sensitivity to light. A lower ISO not only produces less noise, but also gives you better colors and dynamic range, which is your camera’s ability to capture highlights and darks. It’s recommended to use the lowest ISO possible in order to get the best quality out of your camera.
Even in dim or dark environments, you still might be able to use a low ISO. For example, if you use lights to light your scene and open your aperture as much as necessary to let more light get into your camera.
When to use High ISO (ISO 6400)
High ISO has consequences. If your ISO value is too high, you’ll get noise (a lot of grain in the image) and this can make them unusable. Most cameras give you the option to select manually your own ISO, but this setting can also be automatically adjusted by the camera.
The image below shows several images of the same three captured with 3 different ISO values. The quality of the image is worst for high ISO value because a lot of noise appears.
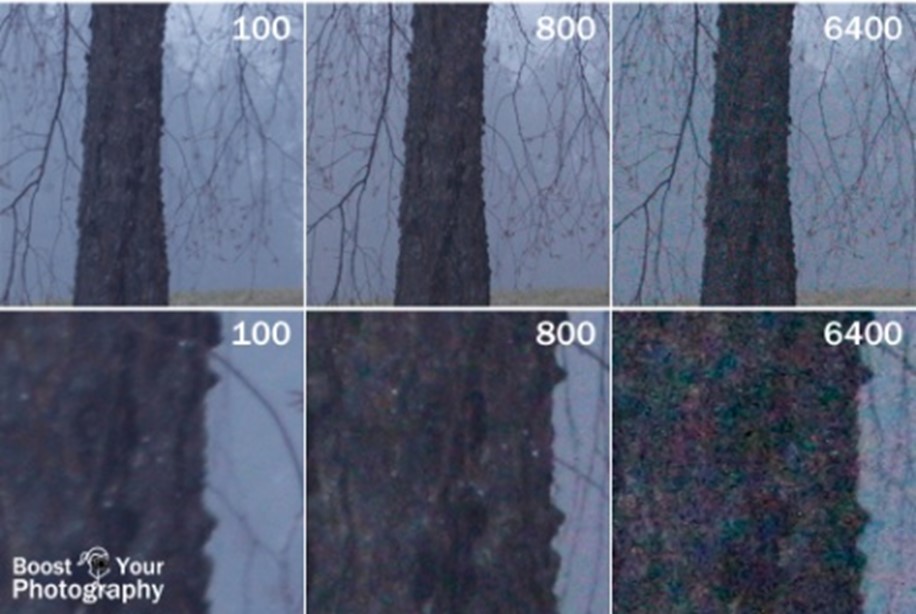
Image Copyright © BoostYourPhotography
Due to the noise problems, brightening a photo only via ISO is always a compromise, you should also take into account shutter speed and aperture. In fact, you should really only raise it when absolutely nessesary, meaning when you can’t change your exposure with shutter speed or aperture (for example if a longer shutter speed would cause unwanted motion blur).
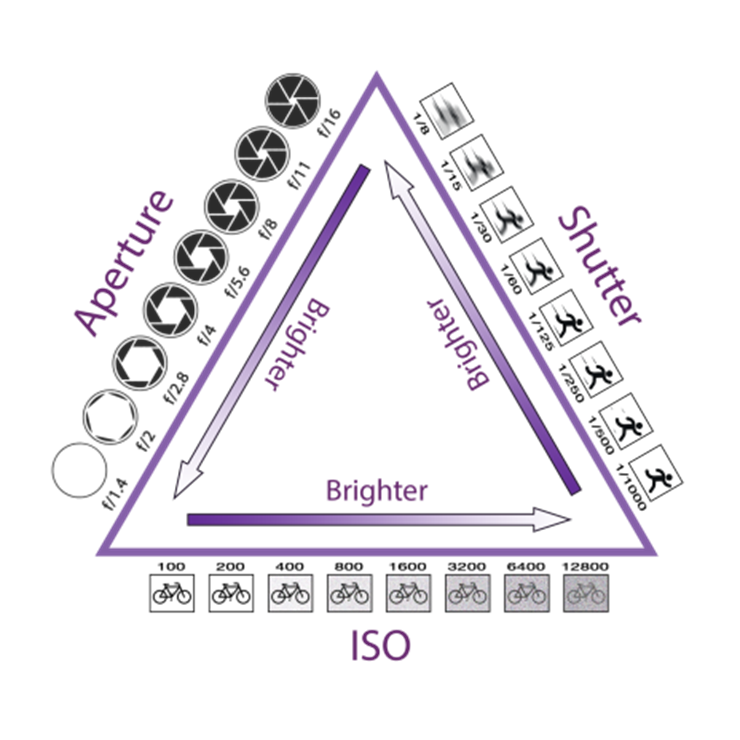
Image Copyright © GarrettHughes
Depending on the decisions you make when configuring the aperture, the speed of shutter and ISO you will get one exposure or another. Aperture and speed directly affect the amount of light reaching the sensor:
- If you close the aperture, you reduce the size of the diaphragm through which the light on the lens, so the amount of light reaching the sensor is less.
- If you open the aperture, more light reaches the sensor.
- If the speed is faster (you reduce the exposure time), the amount of light that reaches the sensor is less.
- If the speed is slower (you increase the exposure time), more light reaches the sensor.
At the same time, the higher the ISO value, the more sensitive the sensor is to light. In other words, the more capacity the sensor has to capture that light. The lower the ISO, less ability of the sensor to capture light. Therefore, aperture, speed and ISO give you full control over the amount of light captured by the sensor and total control over the exposure of your photographs. You increase the exposure using large apertures, slow speeds (long exposures) and high ISO. On the contrary, you decrease the exposure with openings small, fast speeds (short exposure times) and low ISO.
If you want to capture motion with your camera and set a low ISO to have high quality of image, you will require more light so you can reduce the shutter speed, which implies a longer exposure time, and you will get a blurred image caused by the movement. To solve this problem, you should increase ISO (at a cost of some quality loss) to be able to increase the shutter speed, so the exposure time is shorter and the movement is frozen. An alternative to capture objects in movement with low ISO is to increase the aperture to allow more light get the sensor, this avoids the need of reducing the shutter speed and so the blurred image.
When choosing the ISO setting, ask the following questions:
- Light – If the subject is well lit you should use low ISO
- Grain – Do not use high ISO unless it is stricly necessary to avoid noise
- Tripod –If you are using a tripod you would get better quality images with low ISO
- Moving subject – If the object of the photograph is in movement you should properly adjust ISO, shutter speed and aperture to avoid a blurry image
Finally
Additionally, we must consider the automatic values in mobile phones, the resolution of the cameras, the zoom and the effects of filters that can be applied to provide more contrast to the image.
Conclusions
Knowing the right usage of ISO in the camera settings allows us to obtain better quality images.
Video and PDF presentationPulsa para colapsar
The following video explains the content of this lesson and shows some examples:
Here you have the content of the video in pdf in case you need to use it in your classroom:
Pill T2.L2.1 ISO basicsPulsa para colapsar
Pill T2.L2.1 ISO basics
In this pill you see several shoot with different ISO values.
Pill T2.L2.2 ISO for heritagePulsa para colapsar
Pill T2.L2.2 ISO for heritage
In this pill you will learn how to set ISO for cultural or natural heritage.
Lesson contents in PDFPulsa para colapsar
Here you have the contents of the lesson in PDF: