Setting up WebDAV for Windows 8 or later
Note: There must be at least one object (file, folder, etc.) in the space's resources before starting the configuration. This configuration is necessary for each PoliformaT space if you want to use the WebDAV protocol to transfer files from the computer to the space or between spaces.
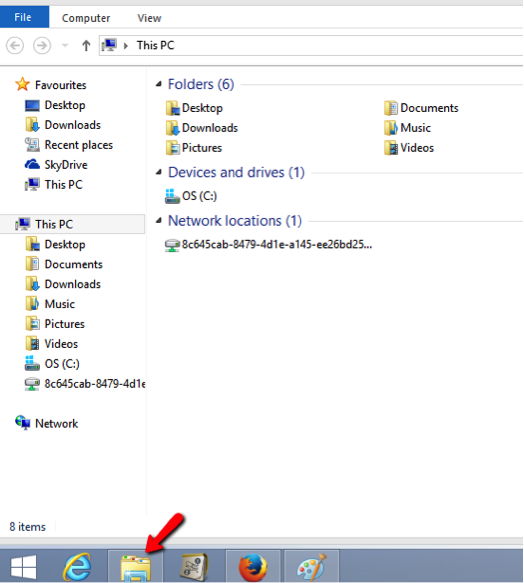
- First you need to navigate to the Desktop: after logging into Windows, click the Desktop icon.

- From the Desktop, click File Explorer and make sure 'This PC' is selected in the left-hand pane.
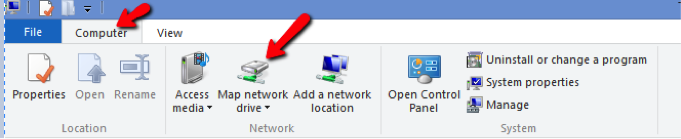
- At the top of the File Explorer window, click Computer > Map Network Drive > Map network drive.
- Select a vacant drive letter (e.g., Y) from the Drive drop down menu.
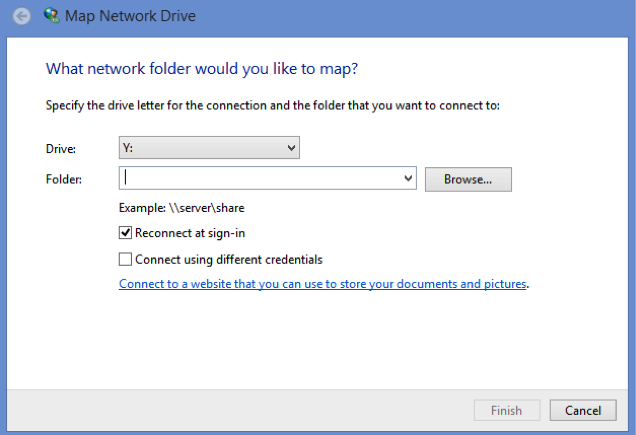
- In the Folder field, type (or copy and paste) the URL for this site (shown above). Click Finish.
- In the pop-up window, you must enter your username and platform password, which MUST be your DNI (without the letter) / NIE / PASSPORT, and click Accept. REMEMBER THAT YOU MUST HAVE AN AUTHENTICATED SESSION OPEN IN POLIFORMAT WITH THIS SAME USER (i.e., your DNI, NIE, or PAS) FOR WEBDAV TO WORK.
- You can now drag files and folders to and from your computer and the site Resources folder.
Alternate method of setting up WebDAV on Windows
If the process above yields connections errors, you may be able to utilize the WebDAV functionality to access your files using a free third-party client called Cyberduck.
Setting up WebDAV for Windows 7 or earlier
Note 1: There must be at least one object (file, folder, etc.) in the space's resources before starting the configuration. This configuration is necessary for each PoliformaT space if you want to use the WebDAV protocol to transfer files from the computer to the space or between spaces.
Note 2: To use WebDAV on Windows Vista, Service Pack 2 must be installed. If you do not have Service Pack 2 installed, you need to run Windows Update by clicking on Start > All Programs > Windows Update.
- From the desktop or the Start menu, click Computer.
- At the top of the window, click Map Network Drive.
- Select a vacant drive letter (e.g., Z) from the Drive drop down menu.
- In the Folder field, type (or copy and paste) the URL for this site shown above. Click Finish.
- In the pop-up window, you must enter your username and platform password, which MUST be your DNI (without the letter) / NIE / PASSPORT, and click Accept. REMEMBER THAT YOU MUST HAVE AN AUTHENTICATED SESSION OPEN IN POLIFORMAT WITH THIS SAME USER (i.e., your DNI, NIE, or PAS) FOR WEBDAV TO WORK.
- You can now drag files and folders to and from your computer and the site Resources folder.
When the setup process is complete, the course or project resources folder will appear under Computer as a drive, where it will act just like any other drive in Windows Explorer. You can now drag files and folders to and from your computer and the site's Resources folder.
Setting up WebDAV for Windows 7 or earlier using Cyberduck
Note: There must be at least one object (file, folder, etc.) in the course or project resource area before you begin the setup procedure. This procedure must be completed once for each site before you can use WebDAV to transfer files to and from any site.
- Following the detailed instructions in the Step 1 of the option Upload-Download Multiple Resources we locate the link necessary to configure the connection, we take this example:
- https://poliformat.upv.es/dav/GRA_12575_2013 (for Resources)
- https://poliformat.upv.es/dav/group-user/GRA_12575_2013 (for Shared Space)
- Access to Cyberduck: http://cyberduck.ch
- Click Download
- Execute the file install.exe and complete the installation wizard.
- Open the application Cyberduck from Applications.
- Click the button New connection.
- Choose WebDAV (HTTP/SSL)
- In Server write: https://poliformat.upv.es
- In Port write: 443
- You must enter your platform username and password, which MUST be your ID (without the letter) / NIE / PASSPORT. REMEMBER THAT YOU MUST HAVE AN ACTIVE AUTHENTICATED SESSION IN POLIFORMAT WITH THIS SAME USERNAME (i.e., your ID, NIE, or PASSPORT) FOR WEBDAV TO WORK.
- Click on More options and type (or copy and paste) in Folder the last part of the "Step 1" URL. One of these two URL:
- dav/GRA_12575_2013 (if you want to access to Resources)
- dav/group-user/GRA_12575_2013 (if you want to access to the Shared Space)
- Click the button Connect.
You will now see a window on your screen that represents the resources that are in your site. Simply drag and drop between this window and other Finder windows to transfer files to and from your Sakai site's resources folder.
If the process above yields connections errors, you may be able to utilize the WebDAV functionality to access your files using a free third-party client called Cyberduck.
Alternate method of setting up WebDAV on Windows 7 or earlier using AnyClient
- Go to the AnyClient website: http://www.anyclient.com.
- Click on the Download Now link.
- Run the install.exe file and complete the installation wizard.
- If the installation does not automatically start the AnyClient program, click on Start > All Programs > AnyClient > AnyClient to run AnyClient.
- Click on Connect at the bottom left.
- Click on New at the bottom left and enter a connection name related to your space within PoliformaT (e.g., Didactics Resources of Education) and click on Next.
- In the Host section, type (or copy and paste) the URL of this space that appears in step 1 and click Finish.
- You must enter your platform username and password, which MUST be your ID (without the letter) / NIE / PASSPORT. REMEMBER THAT YOU MUST HAVE AN ACTIVE AUTHENTICATED SESSION IN POLIFORMAT WITH THIS SAME USERNAME (i.e., your ID, NIE, or PASSPORT) FOR WEBDAV TO WORK.
- In the Connection type section, select WebDAV.
- Click on Save at the bottom of the window if you want to save the details for future connections, then click on Connect.
- Once the AnyClient program is open, select the folder where you want the downloaded documents to be placed.
- Once the location where you want the files to be saved is selected, choose the file you want to download, and click the green arrow icon that says 'Download'. It will be downloaded directly to the location you previously selected.
Setting up WebDAV for Mac (OS 10.4 - 10.6)
Note 1: Depending on the version of your operating system, the use of Finder may be erratic. If you experience issues, we recommend using Cyberduck.
Note 2: There must be at least one object (file, folder, etc.) in the space's Resources tool before starting the configuration. This configuration is necessary for each PoliformaT space if you want to use the WebDAV protocol to transfer files from your computer to the space or between spaces.
- From the menu bar at the top of the screen in Finder, select Go > Connect to Server...
- In the Server Address dialog box, type (or copy and paste) the path as shown above in Step 1.
- Press the + button to save this path for future use.
- Click Connect.
- In the pop-up window, you must enter your username and platform password, which MUST be your DNI (without the letter) / NIE / PASSPORT, and click Accept. REMEMBER THAT YOU MUST HAVE AN AUTHENTICATED SESSION OPEN IN POLIFORMAT WITH THIS SAME USER (i.e., your DNI, NIE, or PAS) FOR WEBDAV TO WORK.
You will now see a window on your screen that represents the resources in your site. You can now drag and drop files into or out of this window and delete files by dragging them to the Trash.
Setting up WebDAV for Linux (Gnome)
- Go to Files > Connect to Server...
- In Server adress, type (or copy and paste) the URL: davs://xxxx/dav/xxxx
- Now click on Connect.
- Finally, you will be asked to supply your password.
You will now see a new drive under Files. This represents the resources in your site. It will act like any other folder on your computer. You can now drag and drop files into or out of this window and delete files by dragging them to the Trash.
Setting up WebDAV for Linux (Gnome) older versions
- Go to Places > Connect to Server...
- In Service type select WebDav .
- In Server, type (or copy and paste): hostname
- In Port, type (or copy and paste): 80
- In Folder, type (or copy and paste) the last part of the "Step 1" URL: dav/xxxx-xxxx-xxxx
- Check the option Add bookmark
- In Bookmark name, supply the name of the folder to create under "Network" and click Next.
- Now click on Connect.
- Finally, you will be asked to supply your password, which MUST be your DNI (without the letter) / NIE / PASSPORT, and click Accept. REMEMBER THAT YOU MUST HAVE AN AUTHENTICATED SESSION OPEN IN POLIFORMAT WITH THIS SAME USER (i.e., your DNI, NIE, or PAS) FOR WEBDAV TO WORK.
You will now see a new drive under Places. This represents the resources in your site. It will act like any other folder on your computer. You can now drag and drop files into or out of this window and delete files by dragging them to the Trash.
Setting up WebDAV for Linux (KDE)
- Open the file manager (Dolphin).
- On the left side, in Places, choose Network.
- Click on Add network folder.
- Check web folder (webdav) and click on Next.
- In Service type select WebDav .
- In Server, type (or copy and paste): https://poliformat.upv.es.
- In Port, we enter: 80
- In Folder, type (or copy and paste) the last part of the "Step 1" URL: dav/xxxx-xxxx-xxxx
- If the URL uses HTTPS, check the option Encoded, and the port will change automatically to 443.
- Check the option Create an icon for this remote folder, you will save all the data, and you won't have to enter it again.
- Now click on Save and connect.
- When connecting, a window will appear requesting the PoliformaT key. REMEMBER THAT YOU MUST HAVE AN AUTHENTICATED SESSION OPEN IN POLIFORMAT WITH THIS SAME USER (i.e., your DNI, NIE, or PAS) FOR WEBDAV TO WORK.
When the configuration process is complete, the site's resource folder will appear in Places and will function like a normal folder within Linux. Now we can copy, paste, and drag all types of files and folders from our computer to this new folder.
Setting up WebDAV for Linux (console)
- Open a new terminal.
- Type in the command cadaver URL from Step 1
- You might be asked to accept a certificate
- In the pop-up window, you must enter your username and platform password, which MUST be your DNI (without the letter) / NIE / PASSPORT, and click Accept. REMEMBER THAT YOU MUST HAVE AN AUTHENTICATED SESSION OPEN IN POLIFORMAT WITH THIS SAME USER (i.e., your DNI, NIE, or PAS) FOR WEBDAV TO WORK.
- Now you can download and upload documents from the command line.
Type help for all avaliable commands.
Setting up WebDAV for Ubuntu 14.10
Through console
- Install Apache and Cadaver:
- $ sudo apt-get install apache2
- $ sudo apt-get install cadaver
- Then we connect to webdav $ cadaver https://poliformat.upv.es/dav/xxxx-xxxx-xxxx
- In the pop-up window, you must enter your username and platform password, which MUST be your DNI (without the letter) / NIE / PASSPORT, and click Accept. REMEMBER THAT YOU MUST HAVE AN AUTHENTICATED SESSION OPEN IN POLIFORMAT WITH THIS SAME USER (i.e., your DNI, NIE, or PAS) FOR WEBDAV TO WORK.
- In dav: dav/xxxx-xxxx-xxxx we type this command to visualize the files
- $ ls
- Type $ help too see the available commands.
Alternative methond using Gigolo
- Go to Ubuntu Software Center and install the program Gigolo
- Open the program and in Service type choose WebDav (sure).
- In Server type: poliformat.upv.es/dav/xxxx-xxxx-xxxx
- Leave the route blank
- In Port type: 443
- And in Username you must enter your username and platform password, which MUST be your DNI (without the letter) / NIE / PASSPORT, and click Accept. REMEMBER THAT YOU MUST HAVE AN AUTHENTICATED SESSION OPEN IN POLIFORMAT WITH THIS SAME USER (i.e., your DNI, NIE, or PAS) FOR WEBDAV TO WORK.
- Later introduce our password
- NOTE: Is possible that an error is occured on the first attempt. Try again
WebDAV Configuration for Mac Using Cyberduck
Note: There must be at least one object (file, folder, etc.) in the space's resources before starting the configuration. This setup is required for each PoliformaT space if you want to use the WebDAV protocol to transfer files from your computer to the space or between spaces.
- Download the Cyberduck WebDAV client.
- For Mac OS X version 10.5 and later, download the latest version from: http://cyberduck.ch/.
- For Mac OS X versions earlier than 10.5, download the Cyberduck WebDAV client from: http://update.cyberduck.ch/Cyberduck-2.8.5.dmg.
- Extract the downloaded file and double-click the .dmg file. (Depending on your decompression software settings, the image may mount automatically on the disk).
- A disk image named Cyberduck-2.8.5 should now be available. Drag the disk image to your Applications folder.
- Open the Cyberduck application from the Applications folder.
- Click the New Connection button.
- Select WebDAV.
- In the Server field, type (or copy and paste): https://poliformat.upv.es.
- In the Port field, type (or copy and paste): 443.
- Enter your PoliformaT username and password. REMEMBER: YOU MUST HAVE AN AUTHENTICATED SESSION OPEN IN POLIFORMAT WITH THIS USER FOR WebDAV TO WORK.
- Click More Options and enter (or copy and paste) in the Path field the final part of the URL from step 1: dav/xxxx-xxxx-xxxx.
- Click the Connect button.
A window will appear on your Mac, representing the resources available in your PoliformaT space. You can copy and paste or drag and drop files from your Finder windows into this new window to transfer files to the resources within PoliformaT.